Inspect Your Roof Before Severe Weather Arrives
Preparing your roof for severe weather begins with a thorough inspection. Taking the time to examine your roof can help you identify vulnerabilities that could lead to costly damage during intense storms, heavy rain, or strong winds. Here’s how to conduct an effective inspection and what to look out for.
Start with a Visual Ground-Level Check
- Sagging or uneven sections of the roof
- Missing or discolored shingles
- Debris accumulation (branches, leaves, etc.)
- Visible cracks or tears in roofing materials
This initial check provides an overview and helps you pinpoint areas that may require closer attention.
Climb Safely for a Closer Inspection
- Shingles: Look for curling, cracking, or missing shingles.
- Flashing: Inspect flashing around chimneys, vents, skylights, and valleys for rust, gaps, or bending.
- Seals: Check around vents and pipes for deteriorated caulking or loose seals.
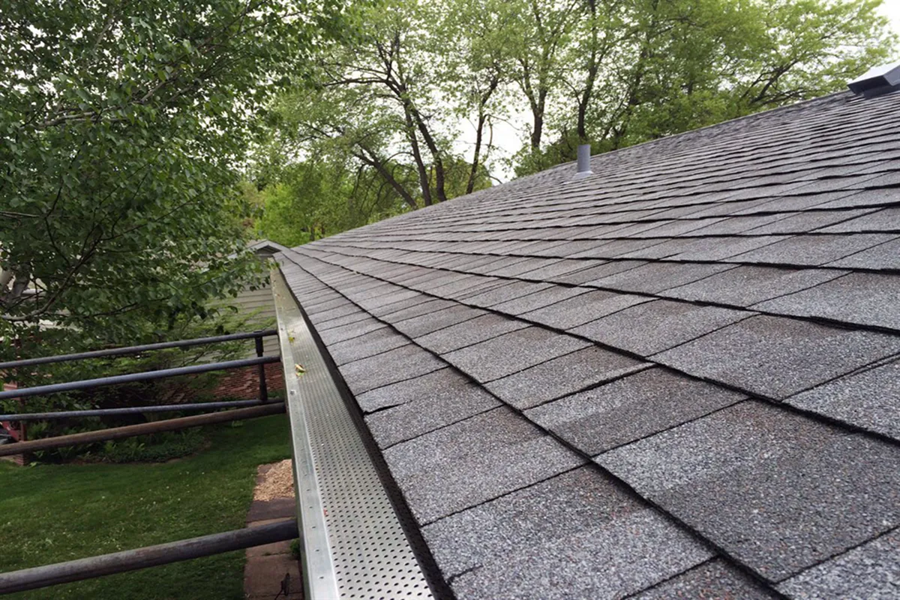
- Gutters: While inspecting the roofline, take note of gutter placement and any sagging sections.
If climbing onto your roof poses risks due to height or steep pitch, consider hiring a professional roofing contractor instead.
Use Technology When Necessary
Modern tools can assist in identifying problem areas without requiring you to climb onto your roof. A drone equipped with a camera can provide detailed images of hard-to-access spots. Similarly, thermal imaging cameras can detect heat loss or moisture intrusion that may indicate hidden damage.
Document Problem Areas
While inspecting the roof, document any issues you find by taking photos or notes. This step is helpful if repairs are needed later as it ensures clear communication with contractors.
| Common Issues Found During Roof Inspections | Potential Risks |
| Missing shingles | Leaks during heavy rainfall |
| Damaged flashing | Water infiltration at joints |
| Clogged gutters | Overflowing water causing foundation damage |
| Weak seals | Increased chances of leaks |
Why Regular Inspections Matter
Proactively inspecting your roof before severe weather hits allows you to address minor issues before they become major problems. Small fixes like replacing missing shingles or resealing flashing are far more manageable than repairing extensive structural damage caused by neglect.
Finally, keep in mind that even if no immediate issues are visible during your inspection, seasonal checks (especially before storm-prone periods) play an integral role in maintaining the integrity of your home’s roofing system over time. Taking these preventive steps gives peace of mind when harsh weather strikes—your first line of defense will be ready when it matters most.
Check for Missing, Loose, or Damaged Shingles
How to Inspect Your Shingles
- Visual Inspection from the Ground: Use binoculars to scan the roof for any irregularities such as cracks, curling edges, or discoloration. Missing shingles may leave exposed patches on your roof.
- Check After Each Storm: Severe weather (like storms with strong winds) often loosens shingles. Inspect your roof after every major storm for immediate repairs if needed.
- Examine the Roof Surface Up Close: If it is safe and feasible for you to climb onto the roof—or hire someone to do so—look out for the following signs of damage:
- Loose or flapping shingles that may detach during high winds.
- Shingles with missing granules (this can be identified by bald patches or granules accumulating in gutters).
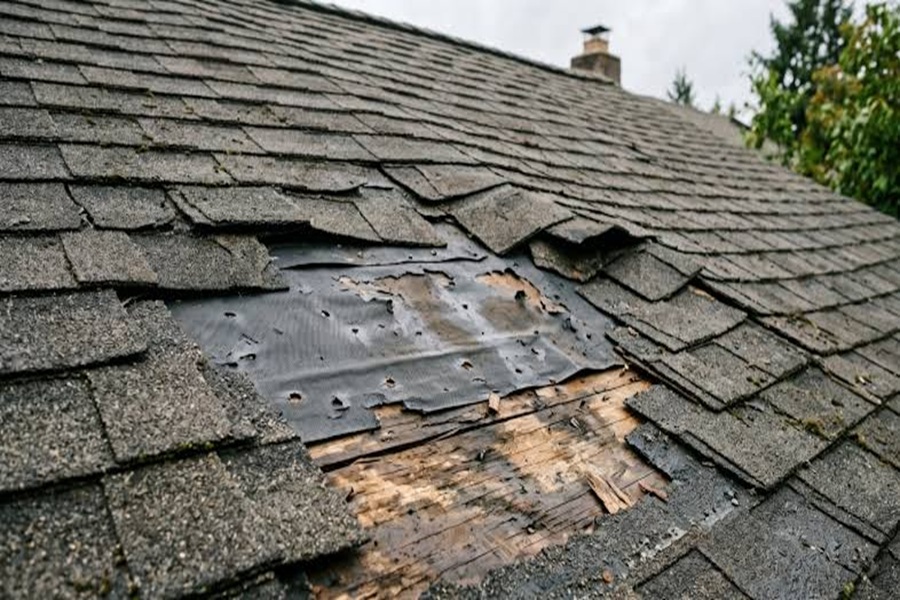
- Torn or cracked areas that expose the underlayment below.
Why Prompt Repairs Are Critical
Delaying repairs can escalate problems over time. Missing shingles expose the underlayment and decking of the roof to moisture infiltration, which may cause:
– Water leaks entering your home. – Rotting plywood underneath. – Mold growth that affects air quality inside your house. – Increased energy bills due to poor insulation caused by a compromised barrier.
How to Address Common Problems
If you notice any missing, loose, or damaged shingles: 1. Replace Missing Shingles Promptly: Even one missing shingle can allow water to seep into vulnerable areas during a storm. 2. Repair Curling Edges: Use a roofing adhesive to secure curling shingle edges back into place temporarily until a professional repair is arranged. 3. Reseal Cracked Shingles: Apply roofing sealant as a short-term fix for minor cracks in otherwise intact shingles.
When Professional Assistance Is Needed
While some minor repairs can be managed by homeowners with basic tools and materials from a hardware store, call in professionals if: – A significant portion of the roof has been damaged. – You notice widespread granule loss on asphalt shingles. – Structural elements like flashing are also compromised.
Quick Reference Table
| Problem | Cause | Solution | Urgency |
| Missing shingles | High winds / old age | Replace immediately | High |
| Curling edges | Aging material / heat | Reseal temporarily | Medium |
| Granule loss | Wear and tear / hail impact | Monitor; replace affected area | Medium |
| Cracked surfaces | Hail damage / movement | Use roofing sealant temporarily | Low-medium |
Investing time in checking and addressing shingle issues before severe weather strikes helps safeguard both your home’s structure and its occupants from unnecessary risks. Remember that routine maintenance is key in extending the lifespan of both individual components like shingles and the overall integrity of your roof system—even during normal weather conditions.
Check for Missing, Loose, or Damaged Shingles
Ensuring your roof is in top condition before severe weather begins is crucial for preventing costly damage. One of the most important tasks you can undertake is checking for missing, loose, or damaged shingles. Shingles are your roof’s first line of defense against harsh elements like heavy rain, snow, hail, and strong winds. Even minor issues with shingles can lead to significant damage if left unaddressed.
Why Inspecting Shingles Is Essential
Shingles play a vital role in protecting your home by: – Acting as a waterproof barrier that prevents water from seeping into your home. – Shielding the roof deck and underlying layers from UV rays, moisture, and wind. – Providing structural support to ensure your roof remains durable over time.
Damaged or missing shingles compromise these functions and leave your home vulnerable to leaks and other weather-related problems.
Steps to Check Your Shingles
- Walk around the perimeter of your house with binoculars to get a closer view without climbing onto the roof.
- Look for visible signs of damage such as curling edges, cracked surfaces, or completely missing shingles.
- If you notice excessive granules in your gutters or downspouts after rainfall, this could indicate aging or worn-out shingles that need replacement.
- Storms often dislodge or damage shingles due to high winds or debris impact. Assess the condition of the roof immediately after extreme weather events to identify any new problems.
- Flashing located near chimneys, skylights, and vents should be securely fastened since these areas are more prone to leaks if nearby shingles are damaged.
Potential Warning Signs of Trouble
If you observe any of the following issues during your inspection, consider addressing them promptly:
– Brittle or cracked shingles indicating they’ve reached the end of their lifespan. – Blistering caused by trapped moisture under the shingle surface. – Corrosion or rust on metal roofing components near shingle lines. – Discoloration (dark streaks) caused by algae growth.
When DIY Isn’t Enough
While homeowners can perform basic inspections themselves, it’s advisable to seek professional help if: – The damage appears extensive. – You notice sagging structures or large patches requiring replacement. – You’re unsure about safely accessing certain areas of your roof.
A roofing contractor can assess deeper structural issues and recommend repairs that go beyond replacing individual shingles when necessary.
Preventative Maintenance Tips
To minimize future risks associated with shingle wear-and-tear:
– Schedule routine maintenance checks at least twice a year (spring and fall). – Use protective sealants designed specifically for asphalt shingles if applicable. – Invest in high-quality replacement materials when upgrading parts of your roof.
By proactively inspecting for missing, loose, or damaged shingles before severe weather strikes, you’ll better safeguard not only your home but also its long-term value as an investment.
Secure Flashing, Vents, and Other Roof Components
Why Securing Flashing and Roof Components Matters
- Loose flashing can blow away or allow water to seep beneath shingles.
- Insecure vents might detach or create openings for leaks.
- Damaged components can weaken the structural integrity of the roof.
By securing these elements before severe weather strikes, you’ll minimize long-term damage risks.
Steps to Secure Flashing
- Inspect for Rust or Corrosion: Check metal flashing for signs of deterioration or rust that might weaken its durability.
- Check for Loose Edges: Ensure flashing is tightly sealed against the roof surface with no gaps or lifted edges.
- Re-Seal with Roofing Cement: For loose flashing pieces, apply a layer of roofing cement underneath to hold them firmly in place.
- Replace Severely Damaged Flashing: If sections are cracked or missing entirely, replace them immediately with new materials to maintain water resistance.
Ensuring Vent Security
- Tighten any loose screws on vent covers to ensure stability during high winds.
- Check seals around vent bases; apply silicone caulk if cracks are present.
- Inspect vent caps for dents or wear that might reduce their effectiveness.
Other Roof Components to Review
| Component | What to Check For | Recommended Action |
| Chimney Caps | Cracks or loose fit | Replace damaged caps |
| Skylight Seals | Deterioration around perimeter | Reapply waterproof sealant |
| Antennas/Satellite Dishes | Secure mounting brackets | Tighten bolts; remove if unnecessary |
Proactive Maintenance Tips
- Perform biannual inspections (spring and fall) along with pre-storm checks.
- Use high-quality materials like stainless steel flashing to resist corrosion over time.
- Keep a detailed record of repairs so you’ll know when replacements may be due.
Securing all relevant fixtures ahead of severe weather ensures peace of mind while protecting both the structure of your home and its interior spaces from water infiltration or storm damage risk.
Check Your Attic for Leaks and Proper Ventilation
Properly maintaining your attic is a critical yet often overlooked step in preparing your roof for severe weather. The attic serves as a barrier between the exterior roof and your home’s interior, and ensuring it is in optimal condition can help prevent costly damage during storms. Below are steps to inspect your attic effectively and ensure that it’s prepared to handle adverse weather conditions.
Inspect for Leaks
- Look for Water Stains: Examine the ceiling and walls of your attic for discoloration or water rings, which are telltale signs of leaks.
- Check Insulation: If insulation feels wet or compressed, it may indicate moisture infiltration.
- Inspect Around Penetration Points: Pay special attention to areas where pipes, chimneys, or vents pass through the roof, as these are common entry points for water.
- Perform a Light Test: During daylight hours, turn off all attic lights and check if sunlight seeps through any cracks or holes in the roof structure.
If you notice any signs of leakage, address them immediately by sealing gaps or replacing damaged shingles to prevent further damage.
Assess Ventilation Systems
- Ensure ridge vents, soffit vents, and gable vents are free from blockages like debris or nests.
- Confirm that no vent openings are rusted or deteriorated.
- A well-ventilated attic has a balance between intake (at soffits) and exhaust (at ridge vents). An imbalance could result in moisture problems.
- Feel for airflow near vent openings; inadequate circulation may require professional adjustments.
- Use a hygrometer to measure humidity levels in your attic. Ideally, relative humidity should remain below 50%. Excessive moisture indicates poor ventilation.
- If your attic uses ventilation fans or powered exhaust systems, confirm they’re functioning properly without unusual noise.
Preventive Maintenance Tips
- Apply weatherproof caulking around vent bases or penetration points such as chimneys or skylights.
- Replace any missing seals on vent covers or dampers that allow excess water entry during downpours.
- Install additional insulation if necessary to absorb minor condensation while enhancing energy efficiency.
Benefits of Addressing Attic Issues Early
| Issue | Potential Consequence | Prevention Outcome |
| Leaks | Structural damage & mold growth | Lower repair costs & healthier air quality |
| Poor Ventilation | Moisture accumulation & ice dams | Extended roof lifespan & better energy efficiency |
| Blocked Vents | Trapped heat/moisture | Reduced risk of structural weakening |
By tackling these issues now, you’ll not only protect your property but also gain peace of mind knowing that both your roof and home interior are ready for whatever Mother Nature brings next.
When to Schedule a Professional Roof Inspection
Scheduling a professional roof inspection is a critical step in safeguarding your home against severe weather. While some homeowners may feel confident performing basic roof maintenance, professional inspections provide expertise and insight that can prevent small issues from escalating into costly problems. Below, we’ll explore when and why you should consider hiring a roofing expert.
Key Times to Schedule a Roof Inspection
- Before Storm Season
The best time to schedule an inspection is before the arrival of storm season. A proactive inspection ensures your roof is structurally sound and ready to face high winds, heavy rains, or snowstorms. Early identification of vulnerabilities can save you from expensive repairs later. - After Severe Weather Events
Once the storm has passed, it’s crucial to check for damage. Even if no damage is visible from the ground, high winds or hail could have caused issues like loose shingles or weakened flashing that only an expert might detect. - When Selling or Buying a Home
If you’re purchasing a property or preparing to sell one, a professional roof inspection adds value. For buyers, it helps assess the home’s condition; for sellers, it ensures transparency and avoids surprises during negotiations. - Annually for Routine Maintenance
Even in regions with mild climates, scheduling an annual roof inspection is recommended. This regular checkup can extend the lifespan of your roof while identifying minor issues before they worsen.
Benefits of Professional Inspections
- Thorough Assessment: Experts check every aspect of your roof—from shingles and gutters to flashing and ventilation systems.
- Safety Assurance: Climbing onto your roof can be hazardous without proper training and equipment.
- Documentation for Insurance Claims: If damage occurs later due to storms or other factors, having documentation from prior inspections may expedite insurance claims.
- Preventative Maintenance Insights: Professionals can recommend specific actions to address wear-and-tear before it becomes problematic.
| Potential Issue | Detected by Professional |
| Hidden leaks | Yes |
| Structural weaknesses | Yes |
| Worn flashing | Yes |
| Small cracks in shingles | Yes |
Choosing the Right Roofing Inspector
- Ensure they are licensed, bonded, and insured.
- Look for companies with strong customer reviews or accreditation from organizations like the Better Business Bureau (BBB).
- Request clear documentation after the inspection—this should include photos of any problem areas identified.
Final Tip: Timing Is Everything
Avoid waiting until severe weather strikes before addressing potential roofing concerns. Proactively scheduling inspections at strategic times will give you peace of mind and keep your home protected no matter what nature throws at it.
When to Schedule a Professional Roof Inspection
Regular roof inspections are essential for maintaining the integrity of your home, but knowing when to call in a professional can make all the difference when preparing for severe weather. This section will guide you on how to determine the best times to schedule an inspection and why professional expertise is crucial.
Key Times to Schedule a Professional Inspection
- After Severe Weather Events
Following heavy storms, high winds, hail, or snowstorms, it’s wise to have your roof professionally assessed. Even if damage isn’t immediately visible, hidden issues like small leaks or weakened shingles can develop into significant problems over time. - Before Peak Storm Seasons
If you live in a region prone to hurricanes, tornadoes, or winter storms, schedule an inspection ahead of these seasons. For instance: - Spring: Before tornado and hail season in many areas.
- Fall: Before winter brings snow and ice that adds extra weight to your roof.
- If Your Roof is Over Five Years Old
While new roofs generally require less frequent inspections, older ones are more susceptible to wear and tear. Scheduling inspections every two years for roofs older than five years ensures potential vulnerabilities are addressed promptly. - When You Notice Warning Signs
Some signs indicate it’s time for immediate professional attention: - Water stains on ceilings or walls inside your home.
- Sagging areas on the roof surface.
- Broken or missing shingles visible from the ground.
Benefits of Hiring Professionals
| Task Performed by Professionals | Why It Matters |
| Checking flashing around vents and chimneys | Prevents water intrusion at critical points of vulnerability |
| Inspecting underlayment below shingles | Detects unseen damage or rot |
| Assessing structural elements like rafters | Ensures overall stability of the roof system |
Their expertise also allows them to identify early signs of common issues such as mold growth, pest infiltration in attic spaces, or improper ventilation—problems homeowners might overlook during casual inspections.
How Often Should You Schedule Inspections?
While specific timing depends on factors like age and weather exposure, general guidelines include: – Every one to two years under normal conditions. – More frequently (every six months) if you live in an area with extreme climate variations. – Immediately after any major weather event that could compromise roof safety.
Preparing for Your Inspection
To get the most value from a professional inspection: 1. Choose licensed and insured roofing contractors with good reviews. 2. Make note of any concerns you’ve observed beforehand (e.g., leaks or unusual noises). 3. Clear debris around your home so professionals can safely access all parts of your roof.
By scheduling regular inspections at strategic times and relying on experts’ knowledge, you’ll have peace of mind knowing your roof is ready to handle whatever severe weather comes its way.